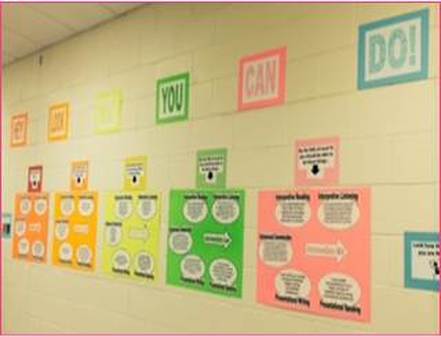
 I have a set of color-coded proficiency posters in the hallway outside my classroom, and also inside on the wall underneath my whiteboard. I use them constantly as reference for myself and my students, and they serve as a reminder of our purpose in the classroom. My purpose is to give them the tools they need to increase their proficiency level, and the first step on that journey is understanding what proficiency means, what the levels are, and how they can improve. So where do we start?  You start at the beginning, at Novice Low, and work your way out of there as quickly as possible! Novice Low is basically word-level repetition and copying...that's no way to live... 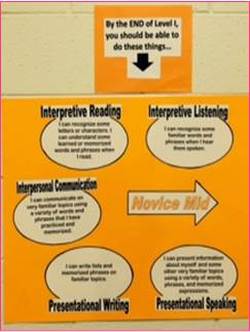 By the end of Level I according to North Carolina, your students should be comfortably in Novice Mid. They can do better...I promise...but they need to know what they're striving for. 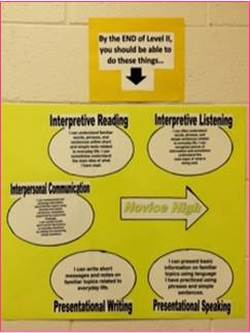 Novice High is the next step. That's where they should be after Level II, all they need to enter the university system here. They still can't survive in the language, but in Novice High, you start to get glimpses of language they are actually CREATING. They can do some Intermediate things, just not all the time. Now, before this becomes a dissertation on proficiency levels themselves, let me share why, for me, these posters are so key. When I grade their speaking and writing with a proficiency-based rubric, I sit right in front of my posters so I can easily reference where they are in each skill I am evaluating. When I talk to them about their work as a class, I have them evaluate their own work based on the posters on the front wall. When we discuss their unit final projects 1-on-1, we sit together in front of the posters and figure out where they are. Having these posters up has really been a big step towards holding them accountable for their proficiency level. To create them... I bought a pack of multi-colored neon poster board and cut out the arrows, colored the level-word the same color as the poster board and then arranged the arrow and the bubbles and titles in the way you see in all the pictures. The media specialist at my school laminated them all for me and then I put them up with hot glue on my cement block walls. To get you started, here are PDFs of all the different level bubbles that I have made (NL-AL) and the arrows as well. Proficiency Poster Resources
7 Comments
Cristina
12/28/2015 05:50:46 pm
THANK YOU for these pdfs! You inspired me to create one for Advanced Mid! I use it for AP. Please email me if you feel that you can use it! Best wishes 2016! Keep writing...blogging..you have great ideas!
Ryan
11/9/2018 11:29:46 am
Cristina, I would love to see those Advanced Mid posters, if you still have them!
teresa
9/14/2016 10:20:07 am
THESE are WONDERFUL!
Beth
10/8/2016 04:44:49 pm
Wonderful! Thank you! Just what I've been looking for!
Sandra
6/13/2017 02:52:26 am
Thank you so much!!!
Susan
8/9/2017 11:32:32 am
I can read the signs above the 1st 3 posters. What do other signs say?
Cheyenne
8/18/2017 03:10:51 am
Many, many thanks!! Leave a Reply. |
|||||||||||||||||
